Showing posts with label easy. Show all posts

Monday, October 3, 2011

Getting in the mood for Fall...

With the air being crisper, and  the days getting shorter... I'm am in the mood for Fall!  The Hawthorn berries are ready, so even though the leaves haven't changed into their Fall colors yet... I'm going to start decorating!  Everything that I used decorated my house with this week cost me nothing... I used only items that I already had, or gathered them from the yard...

 ***My inspiration this week was the Hawthorn berries...
And since I haven't been able to collect leaves yet I decided to make my own out of newspaper...
The first thing I wanted to do was make a wreath (we grow Kiwi and grapes so I have plenty of vine)... 

Stripped of all their leaves, I started with a vine and made it into a circle the size I wanted... then just added and twisted the vines around until  I got the shape I wanted...  This could be done with young branches also, (I've done this with pussy willows, willow trees, alder, poplar, etc.) they just need to be able to bend a little.  Please keep in mind that when the vine/branched are cut, they need to be used right away... once they dry out they will break if you try to bend them... 
 Now I am ready to add some color...

First some of the Hawthorn branches were added... because they were fresh cuttings, I was able to bend and weave the ends in (don't fret if want you want to add doesn't bend... at this point since we have our
shape structured with a wreath you can use wire/string to keep items in place)

Next I needed to cut out my leaves... Picking a leaf from the yard, I then traced it onto newspaper.  Cutting out a few at time got the job done quickly...
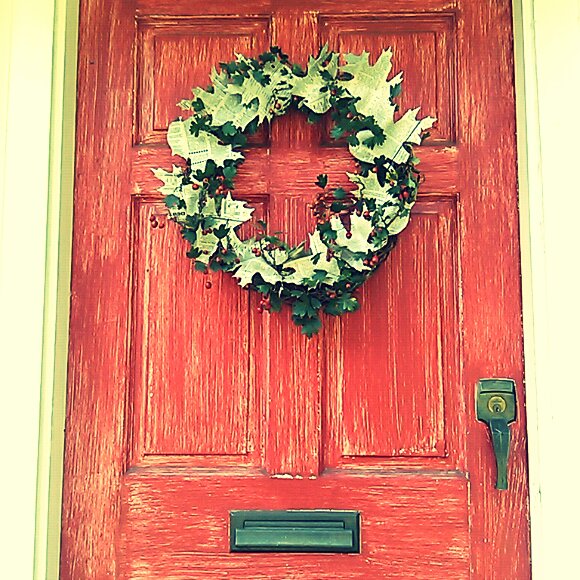
Then I added the paper leaves to my wreath... I used tape to keep them in place...
I really like the contrast of the paper mixed in with berries and leaves of the Hawthorn...
My front door is ready for Fall...
Now to bring Fall inside...
Here are some other ways I used to decorate with the Hawthorn and newspaper leaves...

Taped together,  the newspaper leaves made a quick and simple garland...

Here's how it looked draped in the window...
Its final resting place was on the mantel...
I also gave the garland a little twist as I hung it, giving it a little more texture...
I spread leaves down the dinning room table...
And mixed them in with mis-match candle holders...
The leaves also looked cute wind swept across the window...
I used the leftover Hawthorn branches, and suck them in mason jars... adding some of the newspaper leaves to complete the look...

I love this kind of floral arrangement, because no water is required... yes the berries will dry up, but they still look lovely... 
It's been fun sharing with you what I've been doing this week... Hopefully you will be inspired to look out your window and get in the mood for Fall... It's could be as easy as changing out your place mats on the table, or cutting some branches and sticking them in a jar/vase/pitcher to adorn your table/coffee table/entry way...  I'm in the mood for Fall now... are you? 

Tuesday, September 27, 2011

Adding some color to my life...

OK... (Deep Breath)  Lets get this started!  I have done a lot of thinking, and I think the easiest way to start my journey into this blogging world would be to just share with you what I'm doing this week...  Adding color to my life...
 
***My first inspiration this week was a 70's retro scarf I purchased at Estate sale... I had so much fun playing around with it, knew instantly this was going to be my favorite accessory for this Fall...  

So what did I do?  I made my own pattern, and sewed some up!


I have a craft show coming up for Bits of Envy (one of my hobbies is making accessories out of vintage fabric and buttons), and I think these will be a fun addition...

Here are some of the different ways I came up with to wear the neck tie...


***My next inspiration came from a suitcase I got for free a couple months ago... It is blue with gold fleck.  I was so happy to add it to one I already had... making it the perfect end table for my beloved sectional couch... Over the weeks it has continually caught my eye, and brought a smile to my face... then the idea popped in my head...  I need to somehow recreate that affect on my living room walls.  
So this week I started stenciling 50's star bursts...  Here is how I created the look for under $10....
First I found a pattern I liked online.  I thought this plate was prefect!

Then I got a blank stencil (found at Walmart for $2.97) and traced the pattern onto it... (I pasted it into Microsoft publisher, and then cropped it to the size wanted)       
Next you need to cut out the stencil on a protected surface with a xacto knife...

I selected my paint colors (.97cents for the colors, and $1.47 for the metallic... also purchased at Walmart)  I got 2 blue, 2 metallic gold, one green, and one orange...

Now we are ready to Paint!
Because I wanted a layering affect I cut out two stencils... I started with the bottom layer first...

Then I added the second layer... I also dry brushed gold paint over both stencils to give it that gold fleck effect...


Both stencils done!  I LOVE IT!!!!
Well... that should be enough to keep me busy...  Your mission this week if you chose to accept, is to put some color in your life... It will lift your spirits, even if it's just a new color of lipstick!