So I was looking through Anthropologie's latest catalog... instantly I fell in love with this bag... I don't know if it's the sun shining through the window illuminating the lace, or the perfect simplicity of the design... but I wanted it badly...
 |
| Then I saw the price... $198... This can only mean one thing... I'm going have to just make it my self! |
|
|
| My version... I'm pretty excited about how closely it resembles the inspiration bag... and mine only cost me $8... |
Here are the step by step instructions to re-created mine...
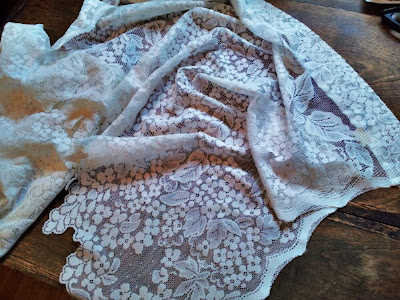 |
| I started with these lace panels that I picked up for $1.99... |
 |
| I also used my new favorite medium... Iron on vinyl... (If you haven't been following me you can see how I've been using it here, here, and here...) For this project you'll need 1 1/2yards (it costs $7.99 a yard at Joann's, but I used a 50% Off coupon so my total cost was $6)...Back to the construction... I started out with a 17"(height)x 20 1/2"(width) piece of vinyl... |
|
|
| Then I rounded off the bottom corners... |
|
|
| Using the vinyl as my pattern piece... I then cut out the lace... you will need 2 of these out of vinyl, and 2 out of lace... |
 |
| Then I cut 2 straps out of vinyl (measuring 1 1/2"wide x 30" long) ... I then cut matching pieces out of some white fabric... |
 |
| I also cut out some reinforcements for the bottom of the straps ( the size is roughly 2" x 2 1/2")... you will need 8 each cut out of vinyl and fabric... |
Now the fun part... ironing on the vinyl to your fabric...
 |
| First you will need to peel the vinyl away from the gridded wax paper... ***DO NOT THROW THIS PAPER AWAY*** Just set it off to the side you will be reusing it in a moment... |
|
|
| Then place the vinyl sticky side down on to your fabric... smoothing it out with your hand... and matching the vinyl up with all sides... |
 |
| With the paper that you set off to the side... place it over the top of your vinyl covered lace( wax side down)... Since my lace has a scalloped edge, I also placed a piece of wax paper underneath the lace... This is so the exposed sections of vinyl don't get pressed onto my ironing board... Now press the whole piece with a dry hot iron... NO STEAM... |
Repeat these last few steps to apply the vinyl to all of your pieces...
 |
| Cut away the excess vinyl from your scalloped edge |
Now to put it together...
 |
| Next with right sides together (be sure to pin within the seam allowance, otherwise you will make holes that will show)... Using a 1/2 seam.... Stitch the sides and bottom together with one continuous stitch... |
 |
| Stitch again at 3/8... this will make the bag more durable... |
 |
| Be sure to notch the rounded corners up to the first set of stitches... so they lay flat when you turn the bag back out to the right side... |
 |
| Turn bag out to the right side... the vinyl may look a little crinkly, but don't worry. Lay your wax paper over it again and press with your hot iron... |
Now for the straps...
 |
| Fold in half (vinyl side out)... and stitch a 1/4 seam... starting and stopping 1 1/2" from the end... |
 |
| Then move your needle over to the right... |
 |
| And stitch this seam again to reinforce it... |
 |
| Next trim off the excess fabric... cutting very close to the second row of stitches... |
Then cut 2 pieces of 1/4 cording the same lenth as the straps... attach a safety pin to one end... and work it through the casing... repeat with other strap...
 |
| Place one end of the strap 3" from the top edge... and 4" from the side... pin in place... |
 |
| Next pin in place the reinforcement piece on the outside... |
 |
| And at the same time pinning one to the inside of bag... sandwiching the the end of the strap in between... |
 |
| Stitch all the way around with a 1/4 seam... |
 |
| Then move the needle over... and stitch again to reinforce... |
 |
| One end completed... now repeat the last few steps with the 3 other strap ends... |
 |
| And your done... |
 |
| Testing it out... holds quite a bit, and still looks cute!... |
This bag was pretty simple to do... I love it when you can cut out a project and complete it in the same day!!! If I make another one though, I think I will try attaching the straps to the front and back before stitching the sides together... I can't wait to test it out... Happy Sewing!!!
***Jennifer


OMG, Jen- this is beautiful. As usual, you are amazing!
ReplyDeleteAhhh... Thanks! I would not be opposed to you sharing the love via pinterest or facebook ;)
Delete